

Updated 4/28/2023 - Please see the important note in the Installation section for a potential issue and fix.
As many of us already know, the 4th and 5th generation Honda Preludes handle extremely well. Their 90's double A-arm front suspension systems do an exceedingly good job of maximizing grip under hard cornering without sacrificing stability in a straight line. They'll even tolerate some mild lowering without the extreme bump steer and shock bottoming that you'll get with modern Macpherson strut cars.
The Problem

As good as it is, however, the Prelude's suspension isn't immune to common suspension geometry problems, especially when you over-lower your car. If you lower your Prelude by more than an inch or two, you'll find that the car won't feel as planted during hard cornering. It might even feel like your car has more body roll than it did when it was stock. And you would be right.
When you lower your car too much, the control arms end up angled in a way that you lose camber under hard cornering. The resulting angles also cause the roll center moving further away from the car's center of gravity, which increases the amount of body roll through corners. If you are interested in the technical hows and whys behind this, we recommend that you read this MotoIQ article by Mike Kojima. TL;DR: It's bad for handling and it's bad for lap times.
The good news is that there are bolt-on parts that will help fix these issues. One common fix is to install extended lower ball joints or "roll center correction kits" into the suspension knuckles. These taller ball joints push the outer pivot of the lower control arms downwards, which corrects some of the geometry problems caused by lowering your Prelude.
The bad news is that no one makes a roll center correction kit for the Prelude chassis. As fans of one of Honda's less-popular models, this is something that we Prelude owners are used to, but it's still tremendously frustrating that such an easy fix isn't available to us. Or so we thought.
The Problem Solvers

Thanks to the ingenuity and hard work of Honda Prelude racers Rusty Shellman and Khai Q. Ngyuen, there is a way to get roll center correction kits for 4th and 5th gen cars.
Rusty tells us that he was looking for ways to improve the cornering capabilities of his 4th gen Prelude racecar, when he noticed that owners of 05-06 RSX Type Ss were using Prelude lower ball joints as replacements on their cars. This was a game-changing find, because K-Tuned makes a roll-center correcting ball joint kit for these popular DC5 chassis. If RSX owners were using Prelude ball joints, maybe these RSX roll center correction kits would work on his 4th gen Prelude racecar?

There was only one way to find out. Rusty bought a set of K-Tuned RSX-S ball joints and tried them on the front and rear knuckles of his racecar. A successful installation confirmed his suspicions - These K-Tuned RSX Type S ball joints do in fact fit and work on 4th gen Honda Preludes.
Fellow racer Khai Q. Nguyen became one of the first to test this modification on the newer 5th gen chassis. Following Rusty's instructions, he installed the same ball joints to the stunning white 5th gen that adorns the banner of this article. He found that the K-Tuned roll center correction kit works - And that it fits both the front and rear uprights on 5th gen cars as well.
When both Rusty and Khai told us about their new discovery, we had to try it for ourselves. So we went out, bought a pair of K-tuned extended ball joints, and set about installing them on the front of the StudioVRM Prelude.
Installation

Installing these ball joints is a little more involved than your average brake job, but is still well within the capabilities of a DIY mechanic. In addition to your usual set of metric sockets (10mm through 22mm), ratchets, combination wrenches (again, 10mm through 22mm), needle nose pliers, and screwdrivers, you will need the following:
A small stack of 14mm flat washers
Or alternatively, a 2-jaw puller of the appropriate size
A set of big Snap ring pliers
A 36mm axle nut socket* (for the front) or a 32mm axle nut socket* (for the rear)
Ball joint separator*
Tie rod separator*
An impact wrench or a stout breaker bar
Small chisel set
4 lb drilling hammer or sledgehammer
Spare front and rear axle nuts (they are one-time use parts on Hondas)
*Most of the specialty tools on the list can be rented from your local parts store. If you don't plan on doing these types of upgrades often, it might be a good idea to do this instead of buying everything outright.
Half the battle is getting the suspension knuckle off the car. This can be a bit of a challenge if you haven't done this before. While the best way is to follow the steps on sections 18-16 to 18-18 of the Honda Prelude Factory Service Manual, we do have a few tips that will help make this process a little easier:
Use a small chisel and big hammer to un-stake the axle nuts so you can loosen them. This is much easier than prying the metal back with a screwdriver or cutting into the nut with a rotary tool.
If you don't have an impact wrench, there's an easy way to remove the axle nuts on your car. Take the center caps off of your wheels, reinstall the wheels, and put the car back on the ground. Put the axle nut socket through the hole for the center cap to un-torque the axle nuts. This will allow you to stand on the breaker bar to generate the torque necessary to loosen the axle nuts. You can also use the same trick to torque the axle nuts to the 181 lbs-ft (front) and 134 lbs-ft (rear) as specified in the factory service manual.
You don't need a ball joint tool to loosen the tie rods and ball joints on Honda suspension knuckles. Honda knuckles have a small outcropping where the ball joints and tie rods seat into the knuckle. Loosen the castle nut and hit these outcroppings HARD with a 4 lb hammer (or a sledgehammer). The impact will squeeze down the tapered surface of the ball joint and force it out of the knuckle. If you need to use a ball joint tool, a good picklefork-type ball joint tool tends to do less damage than the clamp-style tools.
If your Prelude has rusty, mangled cotter pins, there is an easy way to get them out: Use a set of compound needle nose pliers. These pliers have a set of joints in them that doubles the strength of your grip. In most cases, you can just grab the head of a cotter pin and pull to rip it right through the hole.

Once you have the knuckle off of the car, turn it over and use a screwdriver to pull off the metal dust cap off the back. This will give you enough space to use the ball joint press to remove the old ball joint. Remove the snap ring under the ball joint if you have a 4th gen Prelude. If you have a 5th gen, feel free to skip this step. There is no ball joint snap ring on 5th gen cars.

Use the Honda ball joint adapter with the cutout, place it on the top side of the knuckle and use the ball joint press to press out your old ball joint. Removing the rubber boot from your old ball joint can make this process slightly easier, but this isn't necessary. Take your time and make sure the adapter cup is properly aligned with the top of the ball joint before you start tightening down on the ball joint.
Installing the ball joint is much more straightforward. Just flip the ball joint press around, put the small ring die on the other side of the knuckle, and press the K-Tuned ball joint in from the top of the knuckle. Don't worry if the upper part of the knuckle gets in your way. Just put the press in at a slight angle and tighten it down with a ratchet. As long as the ball joint itself is aligned with the hole, it will press right in.
You might notice that the snap ring grooves on the K-Tuned ball joints are buried inside the mounting flange of the knuckle, and that you won't be able to put the included snap rings on the car. This is expected. The lower ball joint mounting flange of the RSX knuckles are a few millimeters thinner than those on the Prelude, so the grooves aren't far down enough for them to show on the Prelude knuckle. Don't worry. Between the top flange of the ball joint and the strength of the press fit, there is more than enough holding power to keep the extended ball joint in place.
Re-install the knuckle the same way that you removed it from the car, with one small twist: Before you install the castle nut for the lower ball joint, place two M14 washers between it and the knuckle.

The cotter pin holes on the K-Tuned ball joints are drilled closer to the end of the threads than they are on the stock Honda ball joints, and as a result, the cotter pin won't engage with the castle nut. The washers will space the castle nut down enough so that the cotter pin will fit between the gaps of the nut.
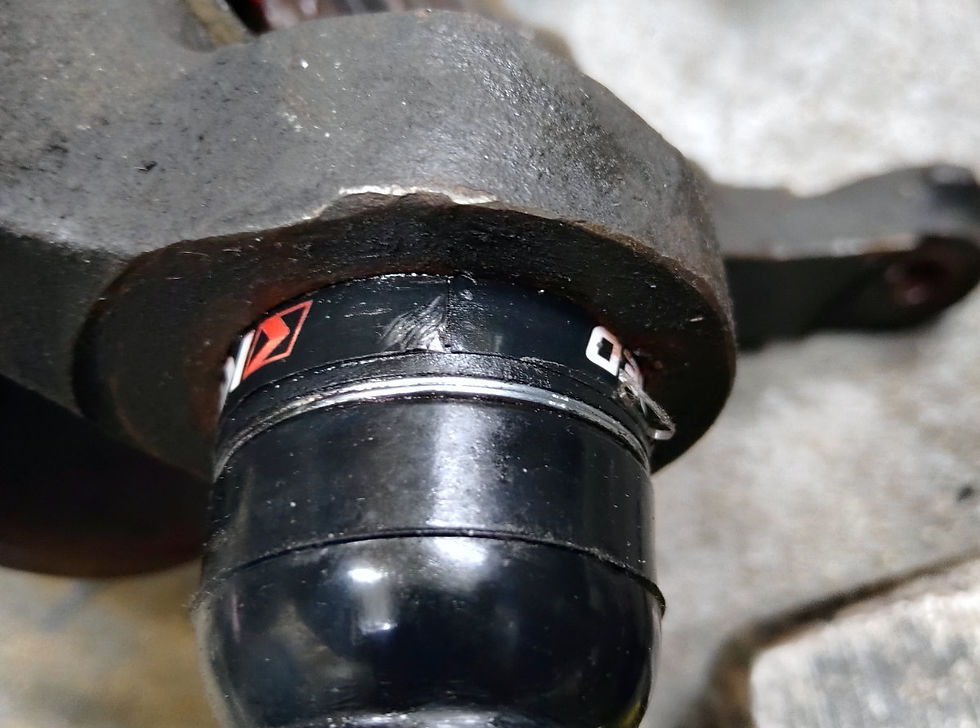
Important Note - Updated - 4/28/2023
Fellow Prelude enthusiast Ben Klassen reached out to us earlier today and informed us that the tapered portion of the ball joint was protruding through the control arm slightly, as you can see in this picture below:

This prevented the castle nut from seating correctly against the underside of the control arm and could potentially cause the ball joint to move around and make noise. To fix this, he trimmed a large washer that had an inner diameter that was slightly larger than the narrowest part of the taper (18mm inner diameter), and fitted it between the control arm and the castle nut:

While we have not seen this yet on the cars equipped with these extended ball joints, we suspect that this may be a more common problem with non-OEM control arms. We strongly encourage you to double check to make sure that this will not be a problem with your car.
We would like to thank Ben for providing this valuable information and these helpful photos in case any of us happen to run into the same problem in the future.
Torque everything down according to the specifications in the factory service manual and put the car back on its wheels to complete the installation process.
Check Your Alignment

The K-Tuned ball joints lower the outer pivot of the control arm about 6mm compared to stock. While 6mm might not sound like a lot, it's an enormous difference in terms of suspension geometry. In fact, the difference is so big that it will change the ride height of your car.
When Khai installed the extended ball joints on both the front and rear suspension knuckles on his car, the ride height dropped by 1/2" (12.7mm) in the front and 1/4" (6.35mm) in the rear. When we installed the front ball joints on the StudioVRM Prelude, we also saw a ride height drop of approximately 1/2".
This change in ride height is significant enough to throw off the alignment of your car. If your Prelude has adjustable height coilovers, you can raise the car back to its original height to avoid having to do another alignment.
If you have access to some basic alignment tools, we recommend that you check your front and rear toe to make sure it's still within spec. If you have a race car, it may also be worth double checking your corner weights just to make sure that everything is still where you expect them to be.
The Results

So what does this do for your car's handling?
Rusty immediately noticed less body roll overall after installing these ball joints. In his words, the car felt like it "dug into corners rather than riding on top of them", indicating higher overall grip levels and better utilization of his outside tyres. This is the sign of a suspension system that is working properly. Khai tested his still-street legal Prelude on local winding roads and had similarly positive feedback on the feeling of the car through the corners.
We can't wait to try it out for ourselves during our next track test. 6mm is a lot in the context of suspension geometry. It's enough to make the difference between a car that turns into corners and one that skates over them. This should make a big difference at tracks which feature very prominent low-speed corners, like NJMP Thunderbolt or Summit Point.
When that time comes, we'll see you at the track.
Special Thanks
Full credit and a big thank you to Rusty and Khai for discovering, testing, and sharing this groundbreaking handling upgrade for our 4th and 5th gen cars. And special thanks to Khai for sending us these great action shots of his car for this article. It's not often that we get to feature such a good looking car on this site.
Also, a huge thank you to Ben Klassen for notifying us of a potential snag that may happen on some cars. It's not something that Rusty, Khai, or we here at StudioVRM have seen, so we are very grateful that he took the time to warn us.
Disclosure section:
Neither Rusty Shellman, Khai Nguyen, StudioVRM, nor Roger Maeda are affiliated with K-Tuned or any of the brands mentioned above. All parts were purchased at full price from each of our own pockets, and installation was performed at the cost of our own time and sanity.
However, the Amazon links embedded above are affiliate links, which means that we get a (very small) commission from them every time you buy a product through those links. We would appreciate if you did exactly that. These parts are expensive and we could really use the money.